Observational drawing practice is about more than just making your drawing look like the subject; it’s about improving how well you see and practicing hand-eye coordination. Our eye can trick us into making many assumptions about what we see, leading to distortions, confusion, and frustration. For example, an object may seem taller than its width when it’s actually the opposite. Seeing in 3D with our two eyes stereoscopically but drawing 2D flat shapes on paper is essentially an abstraction. The practices outlined below help check our visual assumptions against the objective reality of the scene before us and allow us to see and draw that two-dimensional abstraction of reality more successfully. Your drawing will become more accurate, and your experience of drawing will be a more fulfilling enjoyment of seeing deeply.
These techniques work for still life, landscape, figure, portraiture, and any other subject you’re translating from three dimensions to two dimensions, from the simplest still life to the most complex urban landscape. Experienced artists might use these skills without thinking about them but always need practice. For beginners or those who want to improve their existing observational drawings, consider these tips as training wheels for your eyes. The more you practice them, the more they’ll become second nature. Observational drawing is a valuable skill even if you don’t create realistic representational artwork. Keeping an ongoing drawing practice in your sketchbook will improve any art you make outside of it.
Here are 5 techniques guaranteed to improve your drawings from life:
Draw the Overall Shapes Before the Details
The tendency is to get distracted by the details and dive into those first, but details should be considered the icing on the cake and one of the final stages because details need a solid structure to sit atop. That solid structure is the subject matter's overall shape, scale, and form.
Start by positioning the entire scene within the limits of the page so you can include everything you want to include. Many times, we’re so interested in the main subject that we make it larger than it really is, pushing the rest of the scene off the page and compromising our composition. So, to get the correct scale-to-page size to begin with, lightly sketch in the main elements with simple blobs of approximate placement, always with an eye to how each form in the scene relates to the others. Your eye should be dancing back and forth across all the elements and the spaces between them rather than focusing on each element separately. This will ensure the best start to overall proportions.
You don’t have to be perfectly accurate right off the bat. Once you have all the blobs in their approximate place, use the sighting techniques below to gradually correct each form's basic outer shapes, scale, volume, and relative placement. Your lines can become darker as you become more confident in the placement. This tweaking process will take several passes over the whole scene and page as you gradually zero in on the locations and outlines of each form. Enjoy the ride!

Use Vertical Lines, Horizontal Lines, and Angled Sight Lines
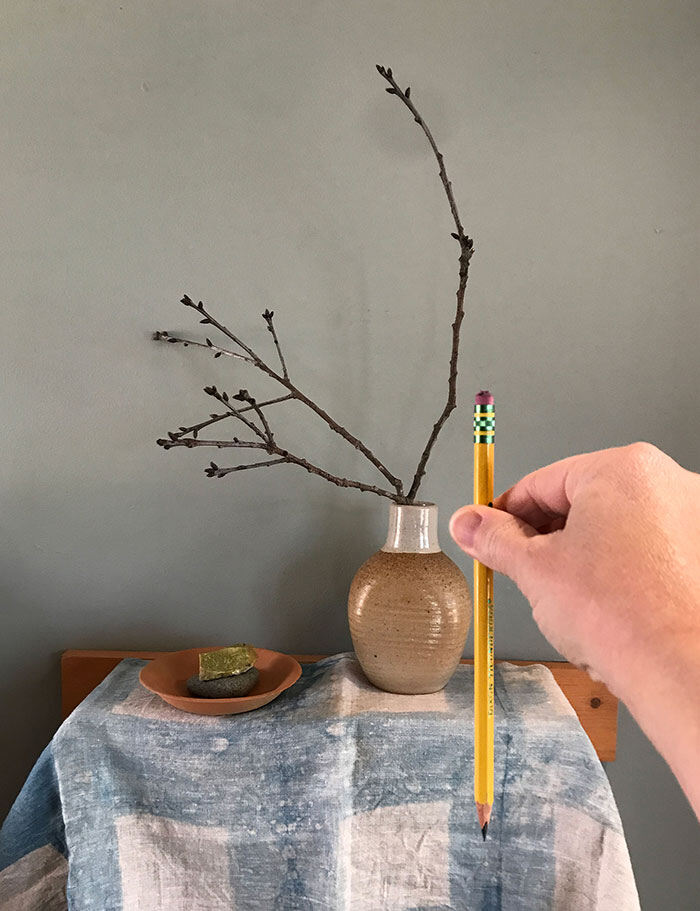
Imposing horizontal and vertical lines over the subject from your point of view will help position elements at the correct height and placement compared to each other. When learning this technique, a thin bamboo skewer or chopstick is a great tool. Having this dedicated ‘Sighting Stick’ encourages you to use it, but you can also use your pencil, pen, or brush handle. The point is to use a longish, thinnish, straight tool that you can impose over the scene but that does not block the scene’s elements.
How to use Vertical Sight Lines:
Holding the Sighting Stick vertically, like a plumb line, put one end on the edge of a form and see where another form falls to the left or right in relation to it. You will be surprised how your eye has tricked you!

How to use Horizontal Sight Lines:
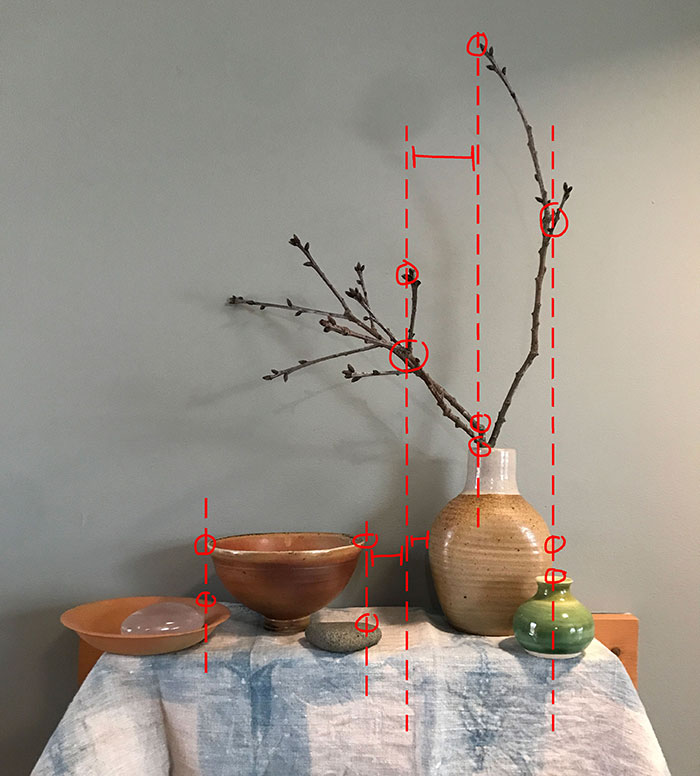
By holding the Sighting Stick horizontally, you can put one end on the edge of a form and see where the tops and bottoms of other forms fall in relation to each other.


How to use Angled Sight Lines:
To find the angles between objects, which also helps find their placement relative to each other, hold the sighting stick at the angle that connects the points you’re trying to find. This works best when your arm is held straight out, not bent at the elbow. Imagine the stick is on a clock face or pane of glass and cannot be tilted toward or away from you. The idea is to keep the stick perpendicular to your line of site so you get the most accurate angle possible. Sighting an angle also helps you see the angle of a form by exaggerating it and showing it to your eyes more clearly. It then becomes easy for you to translate an angled edge to two dimensions.


The great thing about sighting Vertical Lines, Horizontal Lines, and Angled Lines is that they’re helpful at any scale, from assessing the whole scene to measuring within individual forms. This technique also helps you clearly see the negative shapes, which can help draw the positive shapes. For example, the angle of a roof compared to 90 or 180 degrees, the amount a terracotta pot’s sides slope away from the rim, or how far out that arm the model is leaning on really reaches. Angled Lines even assist when you’re measuring a curve because you can lay the Sighting Stick along the main arc and more easily see the overall direction of the curve.
Use the Negative Shapes to Find the Positive Shapes
Negative shapes, often considered the background, are the spaces between the foreground subject. Negative space, however, is relative and depends on context. For example, the wall between a potted plant in the foreground is negative space, but so is the terracotta pot behind a plant leaf that’s further in the foreground.


Our eyes are most easily tricked when we only draw the positive shapes without checking the corresponding negative space. Our brain is designed to focus on positive shapes instead of the spaces between them, but they are usually more complex to decode than the relatively simple negative shapes. This makes negative shapes far easier to see and visually measure, so they’re a useful tool in observational drawing as you hone in on more accurate placement of objects and form edges. Once you get used to looking for the negative space, you’ll never see the same way again!
Sighting for Scale and Proportion
Observational drawing is all about relativity, comparing one area of the subject to another to form a complete whole. Sighting is a way to visually measure the forms in the scene from your point of view and get them in the correct scale and proportion compared to each other and the whole. For this technique to work properly, use your Sighting Stick consistently at arm's length, with elbow unbent, so that the distance from your eye to the stick remains the same. You’ll also want to close one eye, the same eye each time, to eliminate the forms jumping back and forth between each eye’s vantage point, resulting in inconsistent measurements. Keep the stick perpendicular to your line of sight instead of angling it toward or away from you. Finally, keep the same point of view instead of moving left or right, up or down. Decide on your composition's best point of view and stick with it, or your comparisons will have no constancy. All your measuring will be done from this one point of view - not closer or farther away. It’s your source of truth!
Once you have your composition and estimated placement blocked in with light blobs, choose one of the midsize to smaller elements as a ‘key.’ The idea is to use this element to measure the other elements and negative spaces against. It’s as if you’re creating your own 'inch'. This will help keep the entire scene in the correct relative proportion.
Measure the relative width and height of the key form from your point of view. First, measure the shortest dimension from your point of view by holding your sighting stick’s tip up until it meets the edge of one side and placing your thumbnail at the point where the other side ends. Hold onto that place with your thumb and turn the stick perpendicular to how you just held it. Now, count roughly how many of the shortest dimension fits into the longest dimension. Is it about twice as high as it is wide? Or 1-1/2 times as wide as it is tall? Or maybe there’s no difference at all between the dimensions. Lightly draw in the measurement marks from top to bottom. At this point, you’re just creating a 'fence' to draw within. Don’t worry about the exact outline of the form yet.
Now work from the general to the specific in the same key form, keeping within the 'fence' you’ve created to ensure you don’t enlarge or shrink it by accident. Use the same comparative measuring technique above to measure the next most general aspects of the form. For example, how much of the side or top can you see compared to the rest of the form? Is it about 1 part top to 2 parts side? Say there’s a vase that swells near the top and tapers to the bottom. You can see how far up that swell is compared to the tapering bottom and make light outlines to show you where that happens. You can also use a vertical sight line against the side of the swell to see what the negative shape of the tapered bottom looks like. Use vertical, horizontal, and angle sight lines to hone in on the form. Avoid putting in any detail until later in the drawing. After all, you may still need to make adjustments, and you’ll be reluctant to do that if you’ve already drawn in the details.
Once you have the key aspects of the key form lightly in place, you can use it as a measuring gauge for the other forms in the scene. How many of the small vases high is the side of that larger bowl? How many of that key tree’s height fit in the space between it and the next tree over? Immaterial forms like shadows and seemingly empty space are forms, too, and can be measured similarly. Remember, this is approximate visual measuring to help your eyes see better - you don’t need to pull out a ruler or do math. Don’t get overwhelmed by exactitude, or it won’t be fun!
As you lightly draw in the outlines of the major edges in the rest of the scene, you’ll be dancing back and forth between using vertical lines, horizontal lines, angle sight lines, and measuring. You’ll begin to understand which sight line will help you at the time as you solve each part of the puzzle. The goal is to work all over the entire drawing as you compare and contrast placement, angles, height, width, etc. Be willing to correct and erase during the process and open yourself up to change! There’ll be a point later on where you can pin down the style, expression, and amount of detail you want to include.


Draw Through/Follow Through
Observational drawing is a process of building from the general to the specific in overlapping layers. In the early stages of the drawing, use longer and lighter continuous and repetitive sketchy lines instead of short sketchy lines. There’s no need to pin down the exact location of a line at first with a dark and final mark - you’re just beginning to map the line, so keep it loose, light, and non-committal as you sketch and resketch back and forth to find the edges. The light repetitive sketching is an active part of the finding - seeing is not just happening in your eyes, but in your hand as well. Follow the lines through with your whole hand and wrist instead of just moving your fingers. Your wrist makes a great pivot point for curved lines. Following through with a line instead of starting and stopping will make your drawing look more confident and less stiff. Remember that if you start light, you can gradually increase the pressure and go darker as you hone the placement and accuracy of your forms. Relax, and don’t put too much pressure on yourself to get it right with the first stroke.
Instead of stopping where one form goes behind another, picking up the line on the other side, draw each form as if it’s made of glass and can be seen through. This will help you understand how each whole form exists in the three-dimensional space as you translate it into two-dimensional space. This is especially helpful when drawing volumes like cylinders where ellipses, or circles in perspective, can get too football-shaped. It’s also beneficial with the angles found in buildings or tables. When you start with lighter lines, these see-through guidelines will fade into the background when you gradually draw darker as you get more accurate in the middle stages of the drawing.

The techniques outlined above are not meant to dictate the level of expression, style, or energy in your drawing. They’re useful to help you see more thoroughly and accurately, but what you do with that visual information is entirely up to you. You’re the artist, the one who will take the information that’s out in the world and interpret it your way. These guidelines are meant to help you see better, not stifle your style with rigid rules. Use them as tools to help you reach your expression, not the dictator of truth that overrides your artistic vision.
Whether or not you ever draw from life in the artwork you exhibit, you may enjoy this practice of honing your seeing skills, improving your hand-eye coordination, and engaging the creative problem-solving part of your mind. Your visual acuity will improve, and your ability to see more deeply will positively impact whatever type of artwork you make. You’ll find yourself visually measuring in your daily life as it becomes second nature!


