Like any art form, calligraphy takes quite a bit of time and practice to master. Choosing the right tools and supplies is vital to your success, but checking out some art lessons can be just as important. At Cheap Joe’s, we’re always thrilled to share our expertise with our community, and we would love to be part of your journey to developing your skills.
Getting Started with Calligraphy
You can think of this post as a mini art lesson – today’s topic is using calligraphy pens for hand lettering. We included step by step instructions to help get you started.
Step 1: Choose A Calligraphy Pen
There are four types of pens that are most commonly used by calligraphy artists: felt tip pens, fountain pens, dip pens, and brush pens. It’s important to understand the differences between each pen, as they all use different types of ink. The pen you choose to use will depend on a few factors: what style of lettering you want to make, what kind of ink you prefer, how it fits in your hand, and if you’re comfortable writing with it. Let’s walk through the four types of pens in more detail:
- Felt tip pens: These pens are a great choice for beginners because they're easy to use, relatively inexpensive, and come in a wide range of colors and nib shapes. With felt tip pens, you don't have to prepare the ink before you use them, which makes them good for practicing lettering. However, once you get past the beginners' stage, you'll probably want to choose a higher-quality pen. Felt tip pens can run out of ink quickly and the nibs wear down over time.
- Fountain pens: These pens are often used by intermediate or advanced calligraphers. The ink flow takes a bit of getting used to, so they take a bit of practice. Fountain pens feature changeable ink cartridges and metal nibs - the ink is fed into the nib and then onto the page through the nib. The cartridges can be replaced when empty or changed out for a different color.
- Dip pens: These pens are usually used by advanced calligraphers, but they can be used by anyone who has the patience and time to practice with them. Dip pens have two parts: a nib holder/shaft and a nib. Nibs can easily be changed out and come in a wide range of point sizes and shapes for creating all manner of lettering. The ink is supplied separately by dipping the nib into a bottle of ink, so you have to replenish the ink frequently.
- Brush pens: These pens feature a thin round brush head for a nib, made of natural hair or synthetic bristles. The bristles are typically stiffer and come to a sharp point to allow for good control over the lines they're creating. These pens can get messy, so they aren't easy for beginners to master, but they can produce very expressive results with changes in pressure and direction. The artist simply has to learn how to control the brush, as it requires a different technique than a pen with a nib.


Step 2: Put Ink In The Pen
If you’re going to be using a dip pen or a brush pen, don’t forget to purchase some calligraphy ink. If you chose to use a fountain pen, it should come with ink cartridges and nibs already. Before you can use your pens, you’ll need to insert the ink. If you’re using a fountain pen, it usually consists of three parts: the cap, the nib, and the barrel. You’ll want to load the ink cartridge into the nib. Start by removing the cap and barrel from the nib, then insert the cartridge by pushing it onto the non-pointed side of the nib. You should hear a click when it attaches properly. If you’re using a dip pen or brush pen, use an eyedropper to put ink in the reservoir you'll dip your pen into, or many calligraphy inks come in a bottle that you can dip straight into.
Step 3: Choose Your Paper
It’s important that you use fountain pen paper for calligraphy, rather than standard office paper. Regular, low-quality paper is very thin, so if you attempt to practice your lettering on it, the ink will probably bleed all over the paper. You can find fountain pen paper at your local craft store. However, you don’t have to use the highest-quality paper if you’re just starting out and need to spend time practicing your lettering. A heavier printer paper can work for practicing purposes. Lined paper can also be beneficial for practicing basic strokes.
Step 4: Practice Basic Linework
Getting the hang of basic linework is key before attempting full lettering. You want to make sure you’re working on a stable writing surface, and if you’re using dip pens or brush pens, a sloped surface (easel, angled writing desk) will give you even better results. You’ll also want to secure the paper to the writing surface using tape or paper clips, so it stays flat and in place. Once everything is secure, it’s time to begin the process. Here are some basic strokes to practice:
- Downward stroke: With a flat-tipped nib, hold your pen tip edge so it is horizontal to the top writing line (if you’re using lined practice paper). This is called a zero-degree nib angle. Proceed to make a vertical downward stroke on the paper, keeping the nib flat on the paper as you go. Practice applying equal pressure as you make the stroke. Once you’re done, you’ll have demonstrated the thickest downstroke you can achieve with your pen. To get the thinnest stroke possible, pull the pen horizontally across the paper, moving from left to right. Using thick downward strokes and thin horizontal strokes, draw some small squares. This technique will help you learn how much pressure is required to make various-sized strokes with your pen. Make sure you’re using your arm to write with the pen, rather than your wrist. This will help you maintain a steady flow.
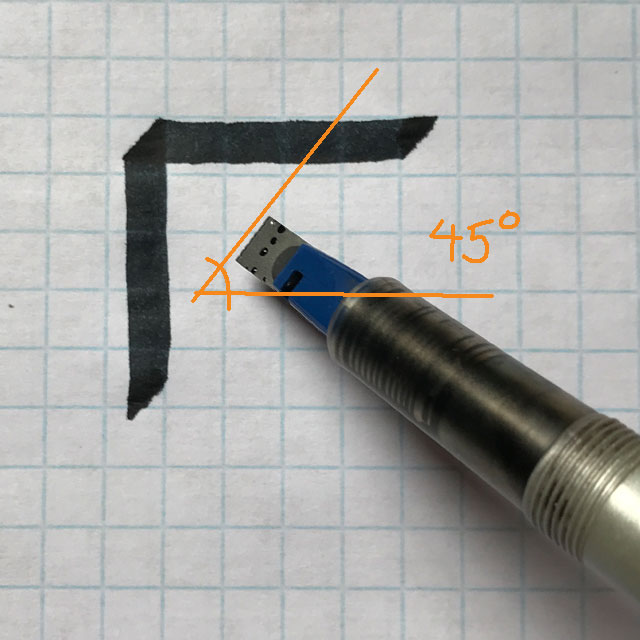
- Upward stroke: To create this stroke with a flat-tipped nib, adjust your pen tip edge so you’re holding it at a forty-five-degree angle. (Using the boxes you’ve created as a guide, cut one side of the box in half diagonally from bottom left to top right and place your nib parallel to the diagonal line. That will be 45 degrees.) Now you can begin making upward strokes at a forty-five-degree angle, starting at the bottom line of your practice paper. When creating upward strokes with brush pens, the more pressure you apply, the thicker your strokes will be. Practice applying various amounts of pressure to make strokes that vary in thickness smoothly. This will become muscle memory the more you practice and you'll see improvements over time.
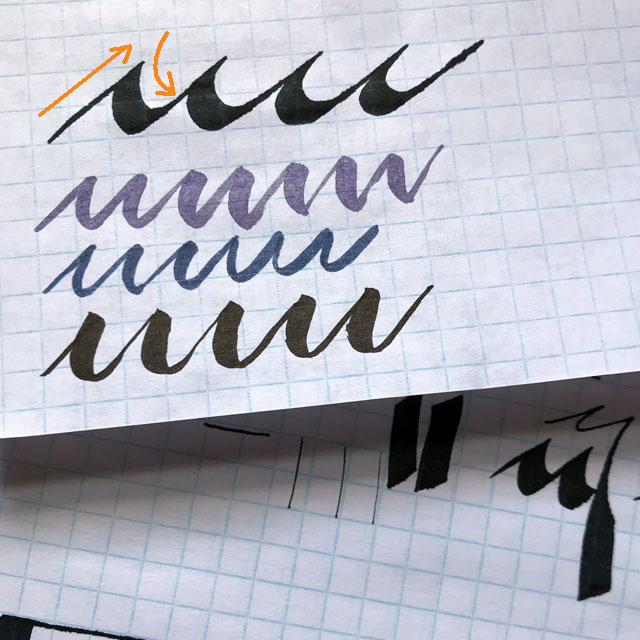
- Sawtooth pattern: To practice angling the pen, use the lines on the paper to create a wave pattern, keeping your pen at the same forty-five-degree angle as before. Alternate back and forth between thin diagonal upstrokes and thick vertical downstrokes, which should result in a sawtooth-like pattern. Depending on whether you're using a flat-tipped nib, a brush pen, or a fine tip nib, you will see more or less variation between the upstrokes and downstrokes. Just play around and see what all the pen can do! This will get you familiar enough with each pen's characteristics so you can be creative.


Step 5: Practice Lettering and Writing Styles
Once you’ve spent some time working on basic linework, you can move on to working with actual letters. There are numerous calligraphy lettering practice sheets available online that you can print, which can help you get used to the movements needed for each letter and style. As a beginner, you’ll want to focus on getting these basic techniques down first. Once you master them, you can move on to creating your unique calligraphy pieces.
Calligraphy Art Lessons
We hope this little calligraphy art lesson was helpful for anyone looking to get started with hand lettering. For more mini lessons and recommendations, check out other posts like 6 Tips for Mastering Calligraphy and watch videos on Cheap Joe's Art Stuff - YouTube. We’re always updating our page with new videos from artists and experts!


