When we think of basic construction, the first thing that comes to mind is Building Construction; high rises, shopping malls, rural housing developments and big burly guys with hard hats driving giant Tonka Trucks around the worksite. In Art, another type of construction is Collage. Collage artists are genuinely constructing their paintings from different art materials and instead of welding, they glue their pieces together!
My brother is an ironworker and he “walks the high steel” up in the clouds; a hard hat is a normal fashion accessory and steel-toed boots are always in style! But I doubt he tells his friends he has a job as an artist. And while these jobs usually have an artistic nature, they are mainly thought of as a totally different field completely. In the same respect, as an artist, I love to “construct paintings” from all sorts of materials, but of course, I would never tell someone I am in “Construction”, although, you know, there are times in which my studio should be declared a “hard hat” area!
A collage construction artist is someone who “builds a painting by adhering layered materials on a foundation of sorts. And Gerald Brommer is one of the best. He is a veteran watercolor artist with many years of experience in transparent watercolor. He has written more than 22 books for high school and college art classes and has produced 15 DVDs, 10 of which were designed exclusively for use in High school and college. Gerald has also edited many high school and college texts and resource books for teachers, along with designing eight sets of posters for use in America’s classrooms to assist teachers. He is clearly an artist with future budding artists in mind and he is truly passing on his passion to the next generation.
Gerald is currently hard at work writing helpful and creative articles about his art. As I was, recently, reading an issue of International Artist Magazine, I came across an article by Gerald entitled “Stimulation”. This particular segment is one of a series of articles focused on introducing “play” into your art. I really loved this concept as I am really a big kid at heart when it comes to painting. As I read the pages, I daydreamed back in time, when we used to tear paper of assorted colors and glue down them with Elmer’s in various patterns and shapes to create a wonderful stained glass window painting. This was also about the time when we all discovered how fun Elmer’s School Glue was to rub on your hands and peel off the dried “skin”! And with that daydream, I, instantly, had a renewed curiosity and desire to create collage art.
So with this renewed desire to collage I popped in Gerald’s DVD entitled “Stained Paper and Collage” from Cheap Joe’s and set off into the “Creative Zone”. Which is incredibly closely related to the “Twilight Zone”, although, many more unusually creative things happen here!
The DVD –
“Stained Paper and Collage”
The Chapters –
The Introduction
The Paper
The Sketch
Applying the Paper
Painting on the Paper
Details and Wrap Up
Gallery
Notes from the DVD –

The Red Door Church
The Introduction –
Make several thumbnail sketches to help you compose your painting from different photos and components. Decide on a season.
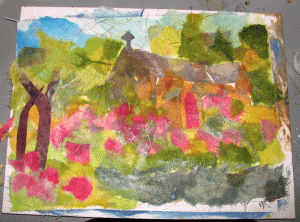
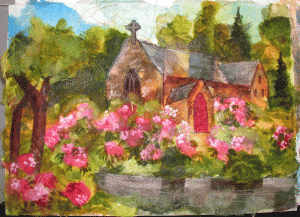
I decided to paint a church in the Valle Crucis area, I lovingly, refer to as the “Red Door Church”. I pass by this beautiful old Episcopalian Church every day on my way to work. It is seasonally surrounded by greenery and colorful flowers almost any time of the year. My painting would be of a spring scene with bright pink rhododendrons in full bloom in front of the church.

Kinwashi Paper
The Paper – Gerald’s preferred paper is “Washi” paper or Kinwashi, which comes in many styles and textures. I picked out a plain fibrous and one with gold tinsel imbedded in it.

Paper Color Palette
Decide on a color palette
Then, tear the paper in smaller manageable pieces and “stain” them with variegated washes of all of the colors you will need to paint with. I used American Journey watercolors. Set aside to dry Note: this was the part that was most difficult for me, the waiting. So I dried them with a hairdryer and only to a dryish/ damp state. They were easier to pull apart and had a naturally deckled edge when pulled.

The Sketch
The Sketch – For the painting’s foundation I chose Kilimanjaro Natural 300 lb. paper cut into quarter sheets. This is Gerald’s preferred size to work on. Transfer your thumbnail sketch lightly to the 1/4 sheet of 300 lb. with a pencil or waterproof ink. Place the colored paper over the sketch to “mockup” your painting to see if you need to revise the design.

Applying the stained paper
Applying the Stained Paper – Gerald uses Liquitex Acrylic Matte Medium as a glue to adhere all of his papers to the base. Apply to base surface and apply paper and cover with matte medium. Continue this process until you have completely covered the painting. Squint to check the value of your design. Don’t worry about staying in the lines. You can tighten up areas with paint. Cut straight edges for roofs, houses, and buildings. Makes it more believable. Use small pieces and overlap. Blend Values for shading and dimension.

Underpainting
This becomes your “underpainting” for your artwork.
Let dry completely. Do not continue until dry.

Shading and Details Painting on the Paper-
Use the same color palette used to stain the paper. Add DaVinci White Artists’ Gouache to your watercolors to brighten and lighten areas. Emphasize shading and darks. Keep corners nondescript. Details and Wrap Up – Spatter to add texture. Refine details. Use a waterproof pen such as the Pigma Micron Pen to add fine detail lines.

Gerald’s unique collage process is really refreshing and helped me to loosen up and unleash my creative self. After I completed my collage painting, I was overwhelmed by the beautiful results! What seemed like child’s play, resulted in a work of art. Throughout the process, I was never really apprehensive or afraid, because i was just playing. It really was like being a kid again. And there was definitely a method to Gerald’s madness for collage!
Gerald Brommer is a wonderful artist and Workshop Instructor. In the past, he taught high school art for 26 years and continues teaching workshops nationwide, as well as worldwide. He is a life member and past president of the National Watercolor Society and is a member of many other professional art organizations. Gerald is currently scheduled to teach at Cheap Joe’s August 26-30. This is a wonderful opportunity to learn this exciting technique from the master himself! He has completely redesigned his workshop material to include new and fresh information for any skill level.

Gerald Brommer: Building Unique Surfaces for Watermedia, Aug. 26-30, 2013
“The new workshop emphasizes the development and use of incredibly rich, textured surfaces. “Build” becomes a keyword, because the uniqueness of the surfaces lies in the variety of materials gathered for use in the process. Anything is usable papers, fabrics, metals, cardboard, washi, paper towels, napkins, dried flowers, wood, string, lace, etc. Once this exciting surface is developed, it is covered with white gesso and allowed to dry. Color can be applied with either transparent watercolor or acrylic paint, or both! The sky’s the limit. The entire process is incredibly exciting and challenging and is a new and unexplored direction in watermedia.”
Gerald has a great way of inspiring new and experienced artists to try something unconventional and different. He is still encouraging artists of all ages to take time to make art. So with this wonderful experience behind me, many ideas and open doors appear in front of me. I am now ready to explore my new found love for paper, paint, and glue. I can’t wait to hang a big sign in my studio reading “Construction Zone Hard Hat Required!” Who knows what I will come up with, the possibilities are endless. The whole world of collage awaits!
So Grab Your Hard Hat and join me in the new adventure of collage! Have a Happy Art Construction Day! Keep your Brushes Wet and Your Collage Stuff Colored, Covered, Smothered, Scattered, Chunked, Topped & Diced! Oh, you know what I mean!

Categories
Categories
Recent Posts
Recent Posts


